What is Little League Elbow?
Little League Elbow is a common injury that affects young baseball players, particularly those between the ages of 8 and 16. It is characterized by pain and tenderness in the elbow and can result from overuse and repetitive motions, as well as improper throwing technique.
The anatomy of Little League Elbow involves the stress and strain placed on the growth plates in the elbow, which are still open in children of this age. While the injury typically responds well to conservative management, with over 90% of players able to return to baseball, there is a relatively high rate of recurrence, with around 13% of players experiencing setbacks within 24 months.
In order to prevent and treat Little League Elbow, it is important to focus on warm-up and stretching exercises, as well as rest and recovery. Additionally, physical therapy and rehabilitation can play a crucial role in strengthening the muscles in the elbow and improving range of motion. By following a gradual return to throwing program and implementing preventive measures, such as regular check-ups with a physical therapist, it is possible to minimize the risk of recurrence.
As parents and coaches, it is important to prioritize proper coaching and technique, as well as creating a safe and supportive environment that emphasizes open communication and a balanced approach to sports. With the right precautions and support, young athletes can keep their elbows healthy and avoid the dreaded Little League Elbow.
Anatomy of Little League Elbow
Little league elbow is an overuse injury to the growth plate or physis of the lower arm bone (called the ulna). Essentially, stress in the arm tends to injure the weakest link of the body. In older players, the bones are hard and relatively resistant to injury, therefore older players tend to deal with more soft tissue injuries like the UCL (Tommy John ligament) or the forearm flexor and pronator muscles. In younger players, the growth plate is made out of soft cartilage and is the “weak point” of the elbow.
In little league elbow, the cartilage of the growth plate undergoes a series of microtraumas from the repeated valgus stress of throwing a baseball, with pitching being the most stressful throwing motion in baseball. These small series of traumas to the growth plate can cause a widening of the growth plate, and eventually an avulsion fracture at the elbow if not managed correctly.
Causes of Little League Elbow
Little league elbow is caused by overuse of the arm through throwing. It is more common in young pitchers than in young position players. It can be caused by too many throws in a day or week, playing too many games, poor pitching mechanics, or not taking time off from throwing in young players.
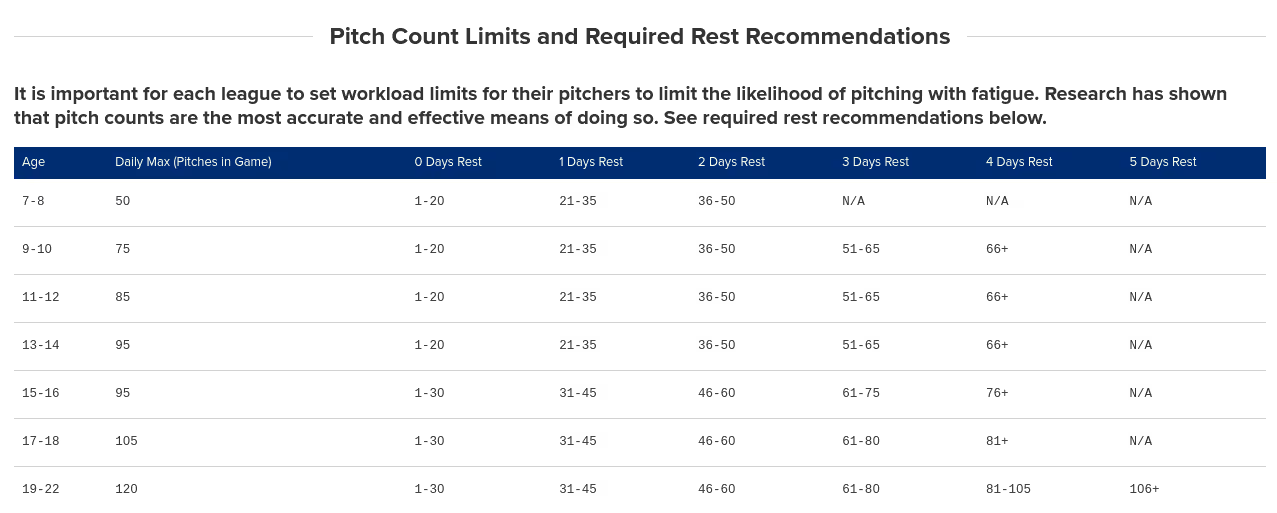
The largest correlation with increased risk of elbow pain with throwing in 9-14 year old athletes was increased number of pitches in a game. Once a player is above 75 pitches/game, they are increasingly more likely to develop elbow pain with each pitch thrown. Throwing more than 370 pitches per season also statistically increased the risk of developing elbow pain in 9-14 year old players.
Evaluation of pitching mechanics in youth pitchers can be an important part of managing or preventing little league elbow. While there is no one known "deviation" in pitching mechanics that has been shown to increase risk of elbow injury, there are some key patterns that are shown to increase stress on the shoulder and elbow in pitchers.
The end goal of pitching mechanics is to have the highest possible arm speed with the lowest possible stress. This concept of "arm efficiency" is key to both performance and injury prevention.
Specifically, research has indicated there are 5 main mechanical checkpoints we look for to decrease arm stress in throwers.
- The hips lead the movement
- The hand gets on top of the ball at glove break
- The hand is at or above shoulder height at front foot plant
- The shoulders are relatively closed to home plate at front foot plant
- The stride foot points towards home plate (there can be some individual differences in this based on players anatomical differences)
Working with a professional to identify any inefficiencies and work on technical changes can be key to both preventing and managing little league elbow.
Symptoms and Diagnosis of Little League Elbow
The most common symptom of little league elbow is pain on the inside of the elbow when throwing a ball, swinging a bat or racquet, or gripping an object. While less common, little league elbow can also present with decreased range of motion or pain with bending and straightening the elbow.
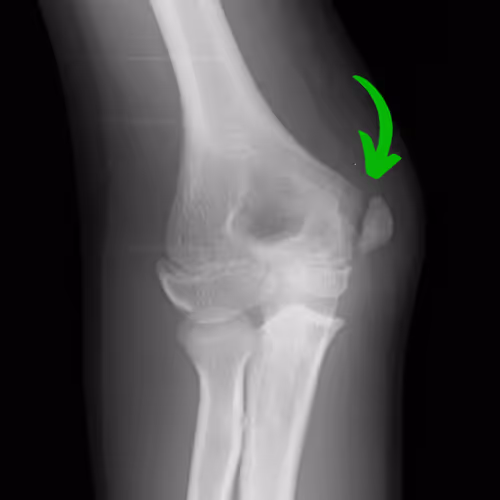
Diagnosis of little league elbow is typically done via clinical examination with a history of throwing and pain on the inside of the elbow. Diagnosis is confirmed via x-ray that shows a small separation of the growth plate on the medial epicondyle.
Complications of Little League Elbow
The most common complication of little league elbow is an avulsion fracture of the medial epicondyle. This is a relatively rare, but significant complication that happens in roughly 16% of little league elbow cases. This is most commonly found in athletes who continued throwing through pain or ignored medical guidance for a period of rest to recover from little league elbow.
Management of an avulsion fracture can vary based on the amount of displacement between the fracture and the bone. Some athletes may require a surgical fixation to ensure adequate healing.
Prevention and Precautions for Little League Elbow
Learn the best practices to keep your young athlete's elbow healthy and avoid the dreaded little league elbow injury.
While prevention of every musculoskeletal injury is impossible for athletes, there are several easy steps you can take to reduce the risk of developing little league elbow.
- Monitor overall throwing volume (throw count) within each game, week and season.
- Monitor for arm fatigue and take extra days of rest or lower throwing volumes if needed
- Strength train during the off-season and in-season. Working on basic movement patterns and muscular strength has been shown to decrease injury risk
- Warm up prior to throwing. Going through a basic warm up routine can significantly reduce your risk of developing arm injuries
- Work with a pitching coach to develop efficient throwing mechanics that reduce stress on the arm.
Throwing Warm Up Routine
Completing a dynamic warm up before you throw is one of the simplest and easiest things you can do to decrease your risk of arm injury AND help improve your performance. A throwing warm up should be more than a simple band routine, as it needs to help get your whole body ready to throw.
The acronym we use to structure a warm up is R.A.M.P.
Raise: Get moving, get warm, get the blood pumping!
Activate and Mobilize: work on getting key areas loose and ready to throw
Potentiate: prepare to move fast!
Here is an example warm up routine for throwing:
Raise:
- Bike, Jog, Skip, Arm Circles, Carioca
Activate and Mobilize:
- Soft tissue work: posterior shoulder lacrosse ball, foam roll lat, upper back, hips
- Mobility: t-spine open books, t-spine extension, box sitting hip switches, down dog to half pigeon
- Activate: Rotational lunge, lateral lunge and reach, Hip Airplane, 90/90 External Rotation, Band T to Y
Potentiate:
- Reverse throws, pivot picks
One of the biggest differences we notice between youth pitchers and big leaguers is their attention to detail in how they approach their warm up. Typically, big leaguers are very attentive to small details and take this routine very seriously on a day in and day out basis. They check in with their body and use the warm up as a readiness assessment and small check in on how they are feeling each day.
Younger athletes commonly breeze through the warm up with poor technique and low focus. Check out a snap shot of how Ben Heller, an experienced MLB reliever approaches his daily warm up.
Give this a try the next time before you throw!
Rest and Recovery
As a baseball player, it is important to develop a consistent weekly routine that allows you to prepare your arm for throwing but also have ample time for rest and recovery.
We talk about stacking stress a lot to allow for increased time to recover. Often players will have 1-2 hard throwing days per week (games or bullpens), 1 medium effort throwing day and 2-3 light throwing days with 1 day off per week.
We recommend having your hardest workouts on your hardest throwing day to build in more time for recovery.
Keep the hard days hard and the easy days easy.
Once you build time to recover into your week, how do you recover?
You need to start with the big rocks first:
- Sleep 8 hours per night
- First and foremost, eat enough! Preferably a high quality diet of protein, carbohydrates and lots of color on your plate
- Hydrate. You need to drink 0.5 - 1oz of water/pound of body weight each day
After that you check off those three big rocks, you can move onto "other" things to help recover.
- Meditation and relaxation
- Massage
- Cold tub
- Going for a walk
- Passive modalities: Marc Pro, Normatec, etc.
Most important check in with yourself, see how you feel and listen to the feedback your body is giving you. If you want to be a bit more objective you can now track recovery using technology like an Apple Watch or a Whoop band.
Treatment Options for Little League Elbow
Discover the various treatment options available to help your child recover from little league elbow and get back on the field.
Physical Therapy and Rehabilitation
Overall, the goal of physical therapy and rehabilitation from little league elbow is to:
- Reduce pain in the elbow
- Restore full strength and mobility of the throwing shoulder
- Improve the kinetic chain to decrease stress on the arm
- Prepare the arm for the stresses and demands of throwing
Many times athletes are surprised by how many shoulder exercises are included in the little league elbow rehab, but it is important! Having weak shoulder musculature or restricted shoulder range of motion has been shown to increase the risk of shoulder and elbow pain in throwers. We need to make sure we target this area!
The shoulder exercises may vary based on the player and their individual presentations but some examples of exercises that would be incorporated into little league elbow rehab would be:
- Lumbar locked lat breathing
- Posterior shoulder lacrosse ball
- Eccentric shoulder external rotation
- Kneeling lateral plank horizontal abduction
We also want to strengthen the forearm musculature to better support the elbow. We can do this with:
- Kettlebell holds
- Forearm flexion rotation
- Pronation curls
Throwing is a total body sport. We want to use rehab as a time to address other areas that might be contributing to increased stress on your arm. This often includes lower body stability and control, core control and thoracic spine mobility.
Lastly, we need to prepare the body for the demands of throwing! We will typically finish a late stage rehab progression with plyometric activities that gradually prepare the tissues in the arm to resume the stress of throwing.
Rest and Modification of Activities
Initially, little league elbow requires complete rest from throwing for ~4-12 weeks. During this time the player is able to continue with other athletic activities, as long as they are pain free. For example, many players are able to swing a bat without pain and would be able to continue competing with their team as a designated hitter and base runner.
This initial time period with restricted throwing is a perfect time to address other physical deficits. For example, some players will have a limited shoulder range of motion or decreased shoulder strength that can be addressed through physical therapy and an exercise program. Additionally, it is a great time to work on improving the kinetic chain: addressing core control, thoracic spine mobility and lower body control. Doing so during this phase of rehabilitation can help reduce stress on the arm when the player returns to throwing.
Players experiencing little league elbow are often able to continue with lower body strength training and conditioning with minimal modifications.
Return to Play Guidelines for Little League Elbow
Typically, return to play following little league elbow follows a time based protocol when an athlete can return-to-play. But, with any athletic injury, we at Kinetic SMP recommend following a criteria based protocol before returning-to-play.
Gradual Return to Throwing Program
The primary criteria for progression into the return-to-throwing phase of the rehab is decreased elbow pain. We recommend players have full and pain-free range of motion, full shoudler and grip strength, a return to full and pain-free upper body lifting, and no pain with 1- and 2-hand upper body plyometrics before progressing to a throwing program. Some doctors recommend a repeat x-ray prior to beginning a throwing program, but closure of the growth plates on x-ray is not a requirement to begin a throwing program as long as symptoms have resolved.
Once an athlete is ready to begin throwing it is important to follow a slow build up period to avoid a set back.
Every throwing program is different based on the player, the duration of the shut down from injury and the level that they are returning back to. We wouldn't have a 12 year old follow the same program as a big leaguer!
No matter the level, there are some common themes in all the return-to-throwing program for baseball players.
Before we start this conversation, we need to define some terminology related to throwing:
- Throwing Volume: the total numbers of throw, can be looked at per day, per week or per month
- Throwing Intensity: how hard an athlete is throwing, can be measured by ball speed, arm speed, distance or perceived effort from the player
- Throwing Frequency: how often an athlete throws, measured in days per week
How does that throwing vocabulary apply to getting back to baseball?
Step One: Build Throwing Volume
We recommend starting with low intensity throws, somewhere between 30-60 feet and playing light catch, with a perceived effort of 4-5/10. We recommend starting 3 days per week and gradually increasing the number of throw per day and per week without increasing overall intensity or frequency.
Step Two: Add Throwing Intensity with Long Toss
We recommend players gradually move back by ~15 feet every one to two weeks in their catch play out to a reasonable max distance for their ability level. Often we want to see younger players build back to at least 120 feet of long toss before they begin a mound progression.
Step Three: Add Increased Throwing Frequency
We recommend building up from throwing 3 days/week to 5-6 days/week for most athletes. Often we see players complete a rehab throwing program that has them throw 3 days/week, then they go back to practice and games where they throw 6-7 days/week and their arm starts hurting. They weren't prepared to throw that often.
Within this week, we recommend having 2 harder days, 1 medium effort day and 3 light throwing days.
Step Four: Position Specific Throwing
After completing a thorough return-to-throwing progression, a player needs to reintegrate the skill and stress of their position.
For pitchers, this means going through a bullpen progression that consists of bullpens, live at bats and then simulated game or game action.
For catchers, they need to practice and slowly progress pop throws as these are significantly more stressful than typical long toss.
For position players, they are often able to return to practice with limited limitations as long as they remain pain free.
Monitoring and Prevention of Recurrence
While it is never possible to completely prevent all arm injuries, you can take steps to reduce the risk of recurrence of little league elbow.
- Warm up before throwing: a simple warm up can help reduce both acute and overuse arm injuries
- Monitor pitch counts: watch for total number of throws per week and per season
- Live a high performance lifestyle: try to sleep 8 hours/night, maintain hydration levels, eat a well balanced diet
- Monitor arm health: check in periodically with a physical therapist to monitor for changes in range of motion, strength or movement patterns
- Watch for early warning signs: Is your arm feeling more fatigued? Struggling to recover between starts? Velocity trending down? These could all be early signs of an injury, and intervening early could prevent a minor issue from becoming more significant.
Tips for Parents and Coaches
Arm yourself with valuable insights and advice to support and protect your young baseball player from Little League Elbow.
Importance of Proper Coaching and Technique
Pitching with efficient mechanics can help decrease stress on the arm and reduce the risk of future injury.
We recommend players returning from injury work with a qualified pitching coach to help identify and correct any mechanical inefficiencies that might increase stress on the shoulder or elbow.
It is important to find a pitching coach that has experience working with young throwers and can not only identify mechanical inefficiencies but help the player through drills and cuing to create changes in their delivery.
While mechanics are important, they are not the only thing that matters. Monitoring workload and pitch counts in youth pitchers is crucial to avoid overuse injuries like little league elbow.
It is important to monitor pitch counts in games and practice and keep track of throwing volume across each week and throughout each season. Research indicates that throwing more than 75 throws in games or more than 375 throws per season will increase the risk of little league elbow in youth pitchers.
Creating a Safe and Supportive Environment
It is important for players to have a supportive environment of parents, coaches and teammates to help keep their arm healthy and aide in their long term development.
This means finding a coach and organization that doesn't overuse pitchers, helps monitor pitch counts and will not prioritize one win over a player's health.
It is also important that players are empowered to speak up if their arm hurts, and are encouraged to not throw through pain.
The best youth baseball organizations will also have resources outside of just the coaching staff to aid players. With a structured warm up routine, ideas for recovery, a strength and conditioning partnership and even relationships with qualified physical therapists to help players stay healthy.
Finding a team of skilled individuals that work together to support the long term development of pitchers will help athletes keep their arm healthy! Not sure where to start? Schedule a 15-minute free consultation with one of our doctors of physical therapy and we'll be happy to point you in the right direction!
References:
1. Heyworth BE, Zheng ET, Bae DS. CLINICAL FEATURES AND OUTCOMES OF LITTLE LEAGUE ELBOW IN YOUNG ATHLETES. Orthopaedic Journal of Sports Medicine. 2021;9(7_suppl3). doi:10.1177/2325967121S00146 https://journals.sagepub.com/doi/abs/10.1177/2325967121S00146