How Do I Return Back to Sport After an ACL Injury?
You’ve been crushing your ACL rehab journey and you’re seeing light at the end of the tunnel: getting back to play your sport. You might be starting to think about what that process should actually look like, and maybe question if indeed you are ready to get back on the court, field, etc. This is an incredibly common problem athletes face, and we’re here to hopefully give some clarity or direction in what you need to do to be as prepared and successful as you can be. Returning to your sport can be incredibly exciting and scary at the same time. Having objective goals to achieve as well as a return-to-play process can help you gain confidence in yourself and your abilities.
Do you want to track your progress after ACL surgery? Download our ACL Scorecard to get the same scorecard we use with our high school, college and professional athletes to determine readiness to begin a return-to-practice plan.
The first step to beginning a return-to-play process is completing a thorough testing battery to identify if you are in fact physically and mentally ready to even begin. It is highly suggested that steps are not skipped over. Cutting corners rarely leads to the best outcome. Take ownership of the results and put the work in if you aren’t where you need to be. Below you will find a step-by-step guide for the return-to-sport process.
Step 1: Return-to-Sport Testing
Testing is a vital part to aid in the return-to-sport decision making process. It allows objective measures to give insight into physical performance and readiness. It is not the only tool used to provide this insight, but it is a tool, none-the-less. This means testing alone should not decide your fate. Now, what does a testing battery consist of?
Strength
Quadriceps
Using a handheld dynamometer (HHD) or Biodex will give objective numbers to compare symmetry between legs as well as represent strength levels relative to your own body weight. We are looking for >90% symmetry between legs and 1lb*ft per pound of body weight for HHD, or 3nm/kg if you use a Biodex. This is termed “relative strength”. Now, why is relative strength so important? To give an example, let’s say we have a 250lb football player and a 160lb basketball player. They both achieve 160lb*ft of quadriceps torque on both sides. Their symmetry is 100%, great! The only difference between the two athletes is their relative strength. They both have the same size engine to move two very differently sized vehicles. Each of them has to move their own body weight in their respective sport, and if their engine isn’t powerful enough to move their vehicle well, their risk of poor performance or injury is higher. This is why relative strength is incredibly important. Quadriceps weakness is a HIGH risk factor for poor outcomes after ACL surgery and thus aim for the sky.
Hamstrings
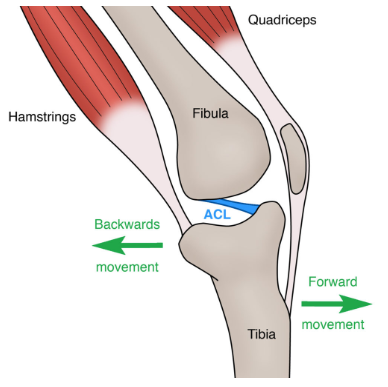
This strength will be tested using the same technology as quadriceps. We are looking for >90% symmetry between legs as well as relative strength being 60-80% of their body weight (and ideally quadriceps). The hamstrings essentially help to protect the ACL as one of their role’s is to reduce the shear force the ACL experiences during a landing or cutting maneuver. They also help in controlling some rotation that occurs at the knee, again protecting the ACL.

Jump performance
Double leg jumps
The use of dual force plates is very helpful to quantify symmetry during double legged jumps. We are looking for <10% of a shift at all points of all jump types. It is common to see athletes shift away from their involved side during double limb jumps which can be an indicator that they aren’t ready if they don’t fully trust their leg. Now, what jumps should be used? We think jumps that use both long-contact time and short-contact time should be assessed, as each of these have different mechanical properties and stresses to them.
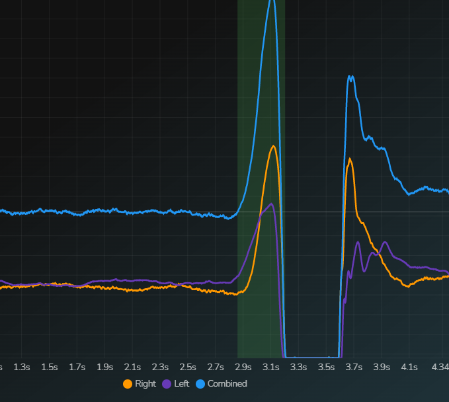
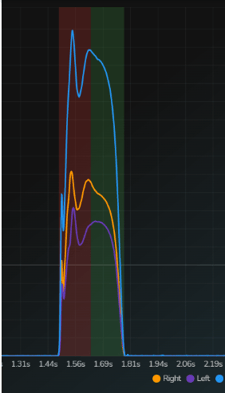
- Squat Jump: This is helpful to look purely at the ability to generate force over a relatively long period of time. See the difference in the 2 photos. The first shows a large difference between the orange and purple lines in the shaded green area. This shows the athlete is shifting more onto the right (orange) side. The next photo shows a more even jump where the athlete jumps evenly off the right and left legs.

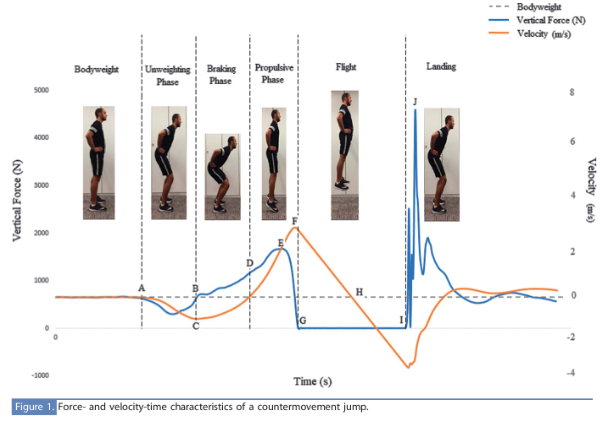
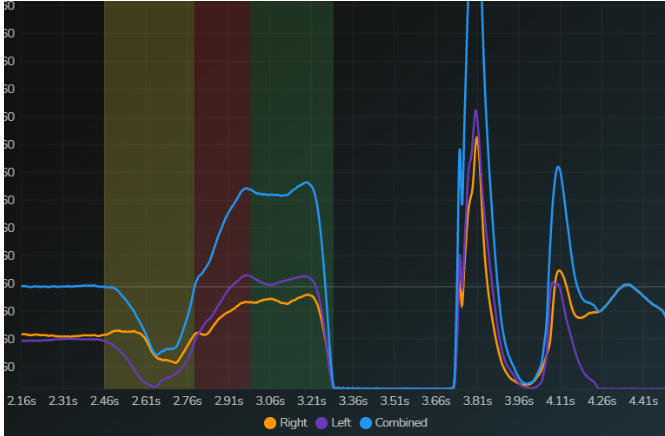
- Countermovement Jump: This jump adds in an unweighting phase (yellow), a lowering, or braking phase (red) and a rising, or propulsive phase (green). Note the pictured examples and compare the purple and orange lines in the yellow, red, and green sections. The first graph shows an athlete shifting off of their right side as noted by the higher purple while the second picture shows an athlete who is mostly balanced.
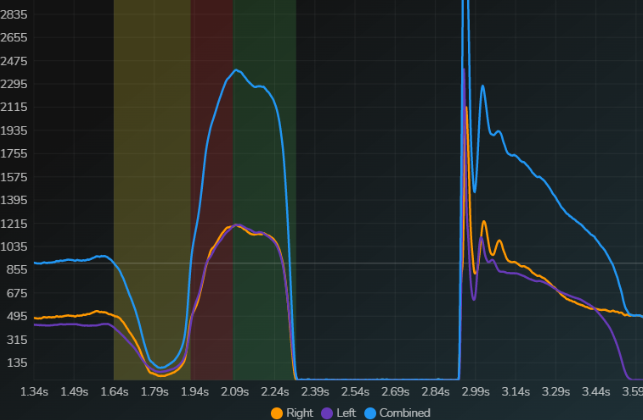
- Drop Jump: This jump is able to assess a more intense braking phase and a propulsive phase. This jump is both more intense and more “elastic” than the countermovement jump. The first picture is of an athlete who is shifting significantly to the right side (note the orange lines are higher) as they are offloading their ACL involved side. Also to note is the shape of the curve. It has multiple humps informing a relatively low performance capability. The second picture shows a much better symmetry and “cleaner” shape demonstrating improved performance and coordination.

Single Leg Jumps
When performing single leg jumps, we are looking at overall performance and strategy between legs to be within 10% of each other. Single leg jumps can be grouped into different categories: vertical and horizontal.
Vertical: Single leg vertical jumps can be performed on force plates as well. Components that are important to look at are overall jump height, countermovement depth, and time to takeoff. Often, if an athlete is not ready, their height will be less, depth will be more shallow, and they will take longer to perform the jump. It is also important to look at metrics that analyze how well they can decelerate vs accelerate themselves. We will often use a single leg countermovement jump and single leg drop jump.
Horizontal: These are some of the most common jump assessments. They can be performed with one jump and assess how far you are able to go. The goal is for each leg to be within 10% of each other in total distance covered. They can also be assessed as a triple hop where you jump repeatedly 3 times and assess the distance. Other variations include crossover hop and a 6-meter timed hop.
Movement analysis – strength/coordination
We will use a movement analysis to assess dynamic strength and coordination. We use a 3D motion analysis program called “Noraxon” that is able to quantify what we are seeing, and our goal is to again be <10% differences from side to side. This can also be done using a smartphone and recording in slow motion. There are also apps out there that can be used to quantify joint angles. Point being, these are things that should be assessed. We typically will assess 3 movements at a minimum:
-
- Single leg squat
- Single leg forward hop landing
- Running
Subjective confidence
A common questionnaire that assesses psychological readiness is called the ACL-RSI. It is a 12 question form where you scale your confidence in your knee while doing your sport. The final score is divided by 12 to give your result (for example, you score 1000 → 1000/12 = 83). The minimum score to pass is a 56, although higher is always better.
Time from surgery: 9+ months
It is recommended that most athletes delay returning to their sport until at least 9 months post-surgery. Athletes that return-to-sport prior to 9 months have substantially higher risk of a second injury than those that don’t.
Step 2: Sport Specific Workload Capacity
The next step that is part of the return-to-play checklist is to ensure that you have enough of a sport specific workload capacity. Now, what does that mean? It is essentially saying that the engine you need to do your sport is ready to do your sport. Even if you pass all the criteria above, but you have been doing no basketball skills, basketball conditioning, or cognitive training, your engine is not ready to play full on basketball. You need to develop sport specific fitness to make sure your body can handle the demands of your sport. Hopefully this workload capacity has progressed and built over the last several months. If it has not, this needs to be built before you are cleared to begin a return-to-sport progression.
Step 3: Shared Decision Making Process
Once the checklist has been passed, the return-to-play process may begin. This is a shared decision making process between the athlete, surgeon, PT/AT, strength and conditioning coach, family, sports psychologist, and sport coach. This is not an all inclusive list of who may share the decision, nor is it necessary for all of the listed individuals to be included.
The point is, the decision is not up to one single individual, but each professional may give their insight into the clearance process. The surgeon may give medical clearance that the graft/surgery is stable and ready. The PT/AT may give physical clearance that the minimum strength, conditioning, and coordination are up to par. The strength and conditioning coach may give their insight on higher level performance clearance. The sports psychologist may give their insight in psychological readiness. The sport coach may give their insight into readiness to sport strategy, performance, and teamwork. The family and athlete give their insight in whether they are personally ready.
Step 4: Return-to-Sport Progression
Once all the above steps are passed, the athlete may be cleared to begin the return-to-sport progression. If you have not been participating in any sport drills whatsoever, you must first begin non-contact, non-reactive drills first, and then proceed as shown below:
- Sport specific non-contact, non-reactive drills (closed drills) for 2 weeks
- These can include things like pre-planned cutting drills, (T-test, pro agility, L drill etc)
- Sport specific non-contact, reactive drills (open drills) for 2 weeks
- These are the same type of drills but involve a reactive component involving cognitive processing and decision making
Then, proceed to contact progression. The main purpose of this phase is to limit risk and build sport specific workload capacity.
Below is a rough basketball example; the specifics will vary depending on the sport you are returning to.
- Small sided games
- Restricted practice participation, no game play for 2 weeks
- i.e. 1v1 → 2v2 → 3v3 → halfcourt play
- Restricted practice participation, no game play for 2 weeks
- Full practice participation for 2-4 weeks (no game play)
- Limited minutes of game play (progressed each game)
- i.e. 5 min → 10 min → 15 min… until full return to typical number of minutes
Step 5: Return to Performance
If you are back to playing your sport, CONGRATULATIONS! That is a huge accomplishment and you should be proud of all of the hard work you have put in to get this far. It is common that athletes will still feel like they aren’t playing at their previous level of performance or where they want to be. Sometimes, this is completely subjective, and other times, it may mean you are now a 6th man (whereas prior to injury you had a starting role). No matter the case, this is a time where you are transitioning from just returning to play to returning to performance. Often, this entails working diligently on your sport skills, working with a strength and conditioning coach to get you to the next level, and patience. If you’ve made it this far, great! But, if you want something you’ve never had, you’re going to have to do something you’ve never done.
Train hard. Recover hard. Repeat.
Don't forget to download your free ACL Scorecard to evaluate yourself where you’re at in your ACL rehab! If you’re about to have ACL surgery, in the middle of your rehab, or even nearing the end of your ACL recovery and want a clear plan with proven methods to get you back to your sport, contact us today! We specialize in ACL recovery and would love the opportunity to help you in any stage you’re at.